Assalamualaikum Wr.Wb
BIsmillah..
Kali ini saya akan membahas tentang bagaimana meng-konfigurasi VoIP (Voice over Internet Protocol) di Cisco Packet Tracer.. Selamat Mengikuti ^^
VoIP (Voice over Internet Protocol)
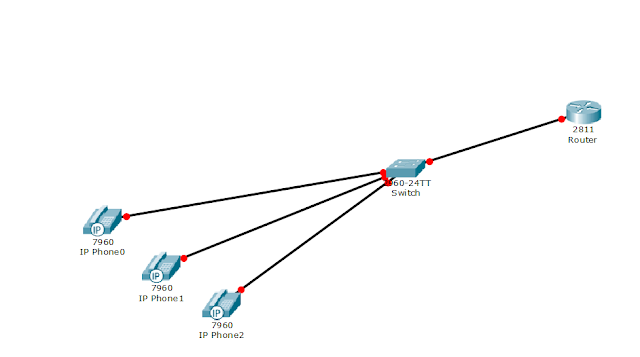
Topologi :
Router (Cisco Router 2811)
|
|
Fa0/0
|
192.168.1.1/24
|
IP Phone (Cisco 7960 IP Phone)
|
|
IP Phone 0
|
DHCP
|
IP Phone 1
|
DHCP
|
IP Phone 2
|
DHCP
|
Dial Number
|
|
IP Phone 0
|
1001
(ephone-dn 1)
|
IP Phone 1
|
1002
(ephone-dn 2)
|
IP Phone 2
|
1003
(ephone-dn 3)
|
6. Menyalakan IP Phone
7. Melakukan panggilan
1. Seting IP Addres router
Continue with configuration dialog? [yes/no]: n
Press RETURN to get started!
Router>enable
Router#configure terminal
Router(config)#interface fastEthernet 0/0
Router(config-if)#ip address 192.168.1.1 255.255.255.0
Router(config-if)#no shutdown
Router(config-if)#exit
Router(config)#
2. Seting IP DHCP
Masih pada mode konfigurasi CLI router, ketikan perintah berikut :
Router(config)#ip dhcp pool VOICE
Router(dhcp-config)#default-router 192.168.1.1
Router(dhcp-config)#network 192.168.1.0 255.255.255.0
Router(dhcp-config)#option 150 ip 192.168.1.1
Router(dhcp-config)#exit
Router(config)#ip dhcp excluded-address 192.168.1.1
- pada perintah diatas
ip dhcp pool VOICEartinya membuat sebuah DHCP service dengan nama "VOICE". - perintah
default-router 192.168.1.1untuk menset alamat tsb sebagai gateway. - perintah
network 192.168.1.0 255.255.255.0untuk menset network dan subnetmask untuk DHCP. - perintah
option 150 ip 192.168.1.1untuk menset option 150 untuk ip tsb (option untuk memberikan alamat ip dari daftar TFTP server) - perintah
ip dhcp excluded-address 192.168.1.1untuk mengeluarkan alamat 192.168.1.1 (router) agar ketika ada DHCP request, ip tidak diberikan ke DHCP client sehingga tidak terjadi conflict.
3. Seting Telephony service
Lanjut konfigurasi telephony service ada router, ketikan perintah berikut :
Router(config)#telephony-service
Router(config-telephony)#max-dn 5
Router(config-telephony)#max-ephones 5
Router(config-telephony)#ip source-address 192.168.1.1 port 2000
Router(config-telephony)#auto assign 1 to 5
Router(config-telephony)#auto assign 4 to 6
Router(config-telephony)#exit
Router(config)#
- pada perintah diatas
max-dn 5untuk menentukan max jumlah dial number. - perintah
max-ephones 5untuk menset jumlah IP Phone yang dapat ter-register dalam satu waktu. - perintah
network 192.168.1.0 255.255.255.0untuk menset network dan subnetmask untuk DHCP. - perintah
ip source-address 192.168.1.1 port 2000untuk menset ip router lokal dan port layanan komunikasi.
4. Seting Voice Vlan 1 di switch
Pada konfigurasi ini kita akan men-set port untuk mengakses vlan voice, Klik pada Switch, pilih Tab CLI kemudian ketikan perintah berikut :
Press RETURN to get started!
Switch>enable
Switch#configure terminal
Switch(config)#interface range fastEthernet 0/1 - 5
Switch(config-if-range)#switchport mode access
Switch(config-if-range)#switchport voice vlan 1
Switch(config-if-range)#exit
Switch(config)#exit
Switch#copy running-config startup-config
Destination filename [startup-config]? (enter)
Building configuration...
[OK]
- pada perintah diatas
interface range fastEthernet 0/1 - 5untuk melakukan konfigurasi pada beberapa interface sekaligus. - perintah
switchport mode accessuntuk masuk ke mode access switch. - perintah
switchport voice vlan 1untuk menset interface 0/1 - 0/5 untuk mengakses voice vlan 1.
5. Setting Dial number di Router
Klik kembali pada router, buka mode konfigurasi CLI, ketikan perintah berikut :
Router(config)#ephone-dn 1
Router(config-ephone-dn)#number 1001
Router(config-ephone-dn)#exit
Karena kali ini kita menambahkan 3 IP Phone, lakukan kembali konfigurasi dial number untuk ephone-dn 2 dan ephone-dn 3 :
Router(config)#ephone-dn 2
Router(config-ephone-dn)#number 1002
Router(config-ephone-dn)#exit
Router(config)#ephone-dn 3
Router(config-ephone-dn)#number 1003
Router(config-ephone-dn)#exit
Router(config)#exit
Router(config)#copy running-config startup-config
Destination filename [startup-config]? (enter)
Building configuration...
[OK]
6. Menyalakan IP Phone
Sampai sejauh ini langkah konfigurasi sudah selesai, yang perlu kita lakukan sekarang adalah menyalakan IP Phone dengan meng-klik IP Phone, pilih mode Physical kemudian hubungkan adaptor ke power chord IP Phone dengan cara Drag n Drop.
Hubungkan adaptor pada semua IP Phone, setelah power dihubungkan, IP Phone akan mulai menyala dan melakukan konfigurasi dengan melakukan DHCP Request dan mencari server yang menyediakan DHCP server/telephony service terdekat di jaringan tersebut. seting didapat dari server melalui TFTP server.
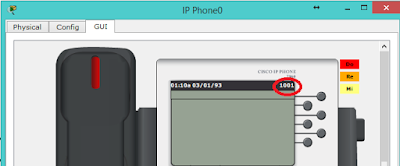
Untuk melihat IP Phone yang telah terkonfigurasi, klik IP Phone dan buka mode GUI, maka akan terlihat nomor telepon yang telah kita alokasikan.
7. Melakukan Panggilan
Untuk melakukan panggilan dari IP Phone, klik pada salah satu IP Phone, kemudian buka mode GUI dan masukan nomor telepon yang dituju dan tekan enter atau klik pada gagang telpon dan telpon dengan nomor yang dituju akan mulai menyala dan berdering
Tekan enter atau klik pada gagang telpon untuk menerima panggilan. keterangan connected berarti telpon sudah salih terhubung ^^.
referensi :
Sekian artikel saya tentang VoIP (Voice over Internet Protocol)
semoga bermanfaat, silahkan jika ada yang mau bertanya atau mengkoreksi.. terima kasih ^^


Work gan thx ilmunya
ReplyDeleteSenang bisa membantu, semoga bermanfaat
DeleteWork gan thx ilmunya
ReplyDeleteGan fotonya hilang sih ..
ReplyDeletefoto yang mana hilang gan?
ReplyDeleteMind the DTMF mixed quality BADLY affects your communications. I have a real story for you; I'm calling one of my banks, they Rep is transferring me to a robot to enter my pin #... I'm entering it, and the robot can't understand the pin. The robot says to enter again... after 3 tries it gives up. ...., and it does not understand your commands due to the line in not DTMF. You must troubleshoot DTMF problems with your VoIP connection through https://route-test.com/voip-quality-delay-jitter-measurement/. They offer a free testing credits. You can find the solution quickly. #VoIP
ReplyDeleteGan.. Kalo ngelihat hasil setting telephony service gmn ya?
ReplyDeleteane ngetik config max-ephones kok malah ada tulisan "Please remove ephone 7 to 20 by re-configuring or reloading the system!!"
soal lks cisco
command "max-ephones X" nya dieksekusi sebelum register dn/ephone nya, kalo ephones ter-registernya lebih banyak dibanding jumlah max yang diinput pasti disuruh delete sisanya dulu
DeleteGan, izin share yah, buat bahan referensi.
ReplyDeleteSilahkan mas :)
Deletebagus gan tulisanya sangat jelas,
ReplyDeleteTerima kasih sdh mampir :)
DeleteMakasih gan infonya bermanfaat banget
ReplyDeleteo ya kalo kita mau hubungin telephone biasa pake homevoip kok telephonenya gk dapet number ya ?
mohon bantuannya
Makasih gan, artikel yang sangat bermanfaat. Tapi ada beberapa settingan yang typo atau tidak pas mohon di sunting gan, agar pembaca menjadi lebih nyaman.
ReplyDeleteTerima kasih... mohon dikutip bagian mana yang typo mas, biar saya perbaiki lagi dan artikel bisa lebih baik lagi :)
DeleteRouter(config)#ephone-dn 3
ReplyDeleteRouter(config-ephone-dn)#number 1002
Router(config-ephone-dn)#exit
Router(config)#exit
mohon koreksi untuk ephone-dn 3 number tsb kok sama seperti ephone-dn 2
Terimakasih
Done..
DeleteTerima kasih ya
Jazakallahu khoiron mas Gani. ilmu yang sangat bermanfaat
ReplyDeletetooooook
ReplyDeleteGan kalo misal ip phone lebih dari 10 auto assignnya gmn?
ReplyDeleteWmeconFperfbi Becki Bell click here
ReplyDeletesenrealeza