Selamat malam..
Kali ini saya dikasih kuis di mata kuliah app networking I, lebih tepatnya sebuah studi kasus tentang routing protocol dan VoIP..
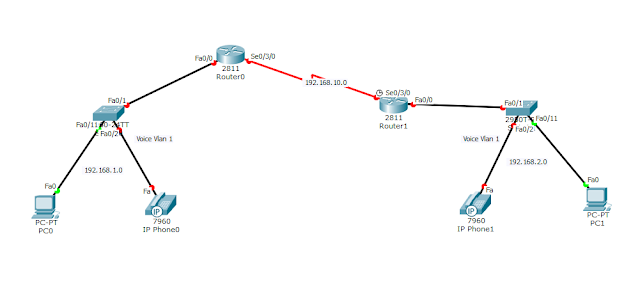
Topologi nya kaya gini :
Directions :
Mari kita mulai mengkonfigurasi ip address dari masing masing interface router yang ada :
Membuat jaringan A : 192.168.1.0 dan jaringan B : 192.168.2.0 bisa saling berkomunikasi, dimana di jaringan A dan B terdapat IP Phones yang harus bisa saling terhubung satu sama lain.
1. Konfigurasi IP Address Router.
Klik pada router 0, klik tab CLI, setting router 0 dengan konfigurasi seperti di bawah
Continue with configuration dialog? [yes/no]: n
Press RETURN to get started!
Router>enable
Router#configure terminal
Router(config)#interface se0/3/0
Router(config-if)#ip address 192.168.10.1 255.255.255.0
Router(config-if)#no shutdown
Router(config-if)#exit
Router(config)#interface fastEthernet 0/0
Router(config-if)#ip address 192.168.1.1 255.255.255.0
Router(config-if)#no shutdown
Router(config-if)#exit
IP Address Router 1 :
Continue with configuration dialog? [yes/no]: n
Press RETURN to get started!
Router>enable
Router#configure terminal
Router(config)#interface se0/3/0
Router(config-if)#ip address 192.168.10.2 255.255.255.0
Router(config-if)#no shutdown
Router(config-if)#exit
Router(config)#interface fastEthernet 0/0
Router(config-if)#ip address 192.168.2.1 255.255.255.0
Router(config-if)#no shutdown
Router(config-if)#exit
Kemudian konfigurasi DHCP dan Telephony service masing masing router :
2. Konfigurasi DHCP dan VoIP.
Masih pada router 0, seting router dengan konfigurasi seperti di bawah
Router(config)#ip dhcp pool VOICE
Router(dhcp-config)#default-router 192.168.1.1
Router(dhcp-config)#network 192.168.1.0 255.255.255.0
Router(dhcp-config)#option 150 ip 192.168.1.1
Router(dhcp-config)#exit
Router(config)#ip dhcp excluded-address 192.168.1.1
Router(config)#telephony-service
Router(config-telephony)#max-dn 5
Router(config-telephony)#max-ephones 5
Router(config-telephony)#ip source-address 192.168.1.1 port 2000
Router(config-telephony)#auto assign 1 to 5
Router(config-telephony)#auto assign 4 to 6
Router(config-telephony)#exit
Router(config)#ephone-dn 1
Router(config-ephone-dn)#number 01
Router(config-ephone-dn)#exit
DHCP dan VoIP Router 1 :
Router(config)#ip dhcp pool VOICE
Router(dhcp-config)#default-router 192.168.2.1
Router(dhcp-config)#network 192.168.2.0 255.255.255.0
Router(dhcp-config)#option 150 ip 192.168.2.1
Router(dhcp-config)#exit
Router(config)#ip dhcp excluded-address 192.168.2.1
Router(config)#telephony-service
Router(config-telephony)#max-dn 5
Router(config-telephony)#max-ephones 5
Router(config-telephony)#ip source-address 192.168.2.1 port 2000
Router(config-telephony)#auto assign 1 to 5
Router(config-telephony)#auto assign 4 to 6
Router(config-telephony)#exit
Router(config)#ephone-dn 1
Router(config-ephone-dn)#number 02
Router(config-ephone-dn)#exit
3. Konfigurasi VLAN Voice & Trunking.
Lanjut dengan konfigurasi VLAN pada switch, dimana setelah mengkonfigurasi VLAN 1 (voice), kita melakukan trunking pada salah satu switch agar vlan 1 di switch 0 dapat berkomunikasi dengan vlan 1 di switch 1 :
VLAN Switch 0 :
Press RETURN to get started!
Switch>enable
Switch#configure terminal
Switch(config)#interface range fastEthernet 0/1 - 5
Switch(config-if-range)#switchport mode access
Switch(config-if-range)#switchport voice vlan 1
Switch(config-if-range)#exit
Switch(config)#exit
Switch#copy running-config startup-config
Destination filename [startup-config]? (enter)
Building configuration...
[OK]
VLAN Switch 1 :
Destination filename [startup-config]? (enter)
Building configuration...
[OK]
VLAN Switch 1 :
Press RETURN to get started!
Switch>enable
Switch#configure terminal
Switch(config)#interface range fastEthernet 0/1 - 5
Switch(config-if-range)#switchport mode access
Switch(config-if-range)#switchport voice vlan 1
Switch(config-if-range)#exit
Switch(config)#exit
Switch(config)#interface fastEthernet 0/1
Switch(config-if)#switchport mode access
Switch(config-if)#switchport trunk allowed vlan 1
Switch(config-if)#
Switch(config)#exit
Switch#exit
Switch#copy running-config startup-config
Switch(config)#interface fastEthernet 0/1
Switch(config-if)#switchport mode access
Switch(config-if)#switchport trunk allowed vlan 1
Switch(config-if)#
Switch(config)#exit
Switch#exit
Switch#copy running-config startup-config
Destination filename [startup-config]? (enter)
Building configuration...
[OK]
OSPF Router 0
Building configuration...
[OK]
4. Konfigurasi OSPF Router.
Klik kembali pada router 0 dan router 1, klik tab CLI, setting router dengan konfigurasi seperti di bawah
Router(config)#router ospf 10
Router(config-router)#network 192.168.1.0 0.0.0.255 area 0
Router(config-router)#network 192.168.2.0 0.0.0.255 area 0
Router(config-router)#network 192.168.10.0 0.0.0.255 area 0
Router(config-router)#log-adjacency-changes
Router(config-router)#exit
Router(config)#exit
Router#copy running-config startup-config
Router#
OSPF Router 1
Router(config)#router ospf 10
Router(config-router)#network 192.168.1.0 0.0.0.255 area 0
Router(config-router)#network 192.168.2.0 0.0.0.255 area 0
Router(config-router)#network 192.168.10.0 0.0.0.255 area 0
Router(config-router)#log-adjacency-changes
Router(config-router)#exit
Router(config)#exit
Router#copy running-config startup-config
Router#
Router(config-router)#network 192.168.1.0 0.0.0.255 area 0
Router(config-router)#network 192.168.2.0 0.0.0.255 area 0
Router(config-router)#network 192.168.10.0 0.0.0.255 area 0
Router(config-router)#log-adjacency-changes
Router(config-router)#exit
Router(config)#exit
Router#copy running-config startup-config
Router#
5. Test Konektivitas
Lakuakan test koneksi dengan mengirimkan paket simple PDU dari IP Phone 0 ke IP Phone 1 atau sebaliknya.


No comments:
Post a Comment